


Crafting Your Gold Mountain Tarpaulin Storage Shelter
Share
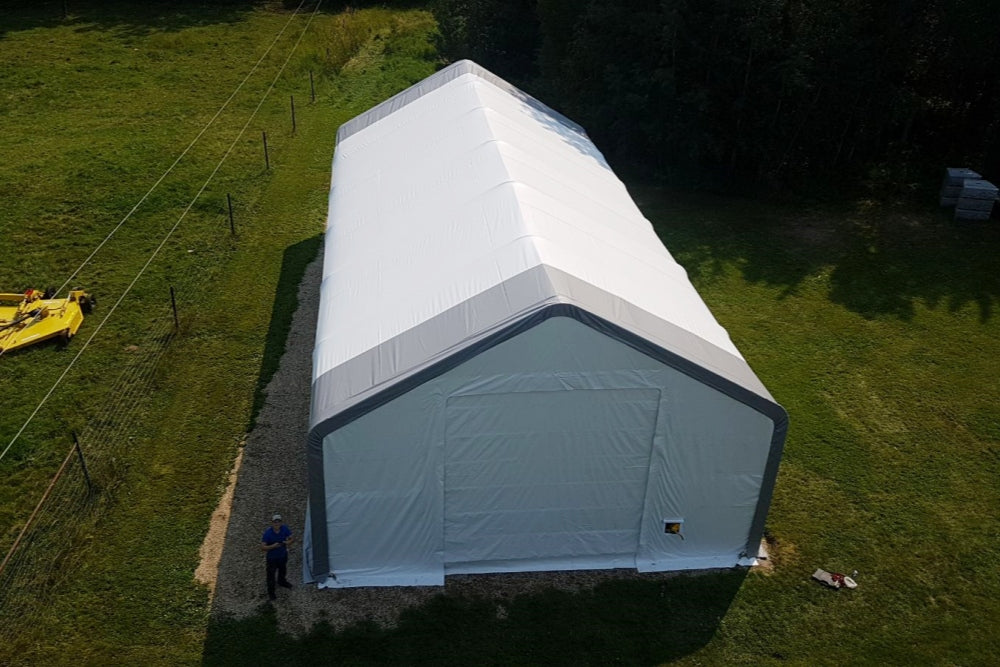
A Gold Mountain Tarpaulin Storage Shelter offers a versatile and cost-effective solution for safeguarding your possessions from the elements. Whether you need to protect your outdoor equipment, vehicles, or create an impromptu workspace, this guide will walk you through the steps to construct your very own Gold Mountain Tarpaulin Storage Shelter.
Materials You'll Need
Gathering the necessary materials and tools is a crucial first step. Here's a list to ensure you're prepared before beginning the construction:
Materials |
Tools |
||
| 1 | Galvanized steel tubing or PVC pipes for the frame | 1 | Measuring tape |
| 2 | Tarpaulin or heavy-duty polyethylene cover | 2 | Marker or chalk |
| 3 | Ground anchors or stakes | 3 | Hacksaw or pipe cutter (if using steel tubing) |
| 4 | Bungee cords or tie-down straps | 4 | Screwdriver or drill (for attaching tarp clips) |
| 5 | Sandbags (for added stability) | 5 | Level |
| 6 | Ratchet straps | 6 | Work gloves |
| 7 | Tarp clips or clamps | 7 | Ladder or step stool |
| 8 | Reinforcement patches (if using a tarpaulin) | ||
| 9 | Zip ties | ||
| 10 | Rubber mallet |
Step-by-Step Construction Guide
Step 1: Choose the Site
Select a suitable location for your shelter. Ensure it's level and free from any obstacles that might hinder the assembly process. Additionally, consider the prevailing wind direction and position the shelter accordingly for better stability.
Step 2: Prepare the Ground
Clear the chosen area of debris, rocks, and vegetation. If you're setting up the shelter on grass or soil, it's advisable to level the ground and remove any bumps. For added stability, you can dig holes for ground anchors or stakes.
Step 3: Assemble the Frame
Follow the manufacturer's instructions to assemble the frame using the galvanized steel tubing or PVC pipes. Connect the pipes using the provided connectors or fittings. Make sure the frame is sturdy and square before proceeding.
Step 4: Attach the Tarpaulin
If you're using a tarpaulin as the shelter cover, drape it over the assembled frame. Ensure the tarpaulin is centered and evenly distributed on all sides. Attach the tarp to the frame using tarp clips, clamps, or zip ties. If your tarpaulin has reinforced corners or edges, use these to tie it securely to the frame.
Step 5: Secure the Shelter
Anchor the shelter to the ground using ground anchors, stakes, or sandbags. Insert the anchors through the provided anchor loops on the tarpaulin or frame. Ratchet straps can also be used to secure the frame to anchor points for added stability.
Step 6: Tighten the Tarp
To prevent flapping and ensure water resistance, tighten the tarpaulin using bungee cords, tie-down straps, or even zip ties. Be cautious not to overtighten, as this might strain the tarpaulin or damage the frame.
Step 7: Reinforce as Needed
If you're expecting heavy snowfall, strong winds, or other challenging weather conditions, consider reinforcing the shelter further. Additional sandbags around the base can help prevent movement, and you can also use reinforcement patches on stress points of the tarpaulin.
Step 8: Regular Maintenance
While the Gold Mountain Tarpaulin Storage Shelter is designed to be durable, regular maintenance is crucial to its longevity. Check the tarpaulin for any tears or signs of wear and promptly repair them to prevent further damage.
Conclusion
Constructing a Gold Mountain Tarpaulin Storage Shelter is a practical and efficient way to shield your belongings from the elements. By following this step-by-step guide and using quality materials, you'll create a versatile shelter that serves your needs for years to come. Remember to prioritize safety throughout the construction process and maintain your shelter regularly to ensure optimal performance.


6 comments
Do you have any 50 foot wide single truss options?
thanks for your rasponse regarding zipper on 30 40 15 r. are there any with zippers,
You can enter 30×65×15 in the search box and you will get the product and its price.
https://www.cheryindustrial.com/collections/storage-shelter/products/s306515r-pe-storage-shelter
How much does the 30′×65′×15′ cost?
Hi there
30 × 65 × 15. Storage shelter has 12 groups of arches.
Any confusion? Welcome feedback. We’ll find the answer for you.